HOME | DD
 shalonpalmer — Mask Making

Published: 2006-05-23 18:10:28 +0000 UTC; Views: 28405; Favourites: 162; Downloads: 357
Redirect to original
Description
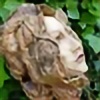
Mask MakingPaper and Fabric Mache
Creating the base layer:
I highly recommend buying a basic paper mask from an arts/crafts supply store. It saves a lot of time and leaves a lot more time for the creative parts!!
Also, I do recommend some time doing a full face casting of a friend – it’s a lot of fun, but it can be fairly frustrating too.
Supplies needed:
Plastic wrap
Flour
Water
Large bowl
Paper torn (not cut) into small strips – preferably heavy brown craft or paper bag paper
Food coloring
1. To do a face casting, pull back hair and place a thin layer of Vaseline over the skin and hairline areas. Place a layer of plastic wrap around the head to cover as much hair as possible. Make sure you cover your work area with spare paper, as the flour mixture does become a glue like paste!! And make sure the person getting cast is in a relaxed position, with their neck supported and the face level horizontally – they’ll be in this position a while, so make it as comfortable as possible.
2. In the large bowl, mix the flour and water at a ratio of one cup flour to one to three cups water. Starting with a cup of water in the bowl and adding additional water to the mixture as needed.
3. Begin taking strips of paper, torn not cut – tearing allows an edge that will blend with those around it making a cleaner flatter surface - and coating them with the flour water mixture. Slowly begin covering the larger areas of the face. Make sure you’re only doing a single layer of coverage. For the details – around the eyes, nose and mouth, it’s easier to tear the pieces of paper smaller. Allow the layer to dry completely. You’ll notice that the paper is dark when applied and becomes lighter in coloring as it dries – also the person being cast will feel it stiffening up.
4. Mix another batch of flour and water, this time dropping in a couple drops of food coloring. The color will be helpful in seeing the places that you’ve placed a second layer.
5. Continue repeating these steps until the mask is at least 6 layers thick, alternating color and non color between layers. Let dry completely.
6. When removing the mask, it is best done slowly and carefully (trust me the person being cast will appreciate it!!!) They should scrunch and stretch their face to loosen the mask from their skin.
7. At this point, clean up!! You’ve created a replica of your friend’s face!! Make sure when cleaning up that you don’t wash the flour and water mixture down a sink drain, just toss what you can in the trash – it will clog pipes!!
Additional surface details:
Creating additional surface details is great fun. Paints, markers, feathers, beads, you name it!! I advise putting a full coat of paint over all surfaces of a bought or made mask base, just to make it sweat and element proof. I also recommend sketching an outline of the design you want in pencil first – the curves and contours of the face can be tricky!
If the addition you want to make is more drastic, like an animal face, or exaggerated features, you can continue to build up the mask using the paper mache method from above, or you can use white craft glue instead, creating a stronger bond, or you can use masking tape, which is a whole lot quicker!!
For masks used in theater work, it is frequent to find that the masks are made with fabric mache, which is entirely similar to paper mache, but is done with thin gauze-like fabric like cheese cloth or muslin. Either the flour mixture or the white glue can be used for this. The masks will be stronger and will last much longer.
I highly recommend the book
The Prop Builder's Mask-Making Handbook by Thurston James [link]
It’s a bit advanced in sections but has great pictures and a lot of other methods.
---------------------------------------
oracletheatreinc@oracletheatreinc.com
[link]
sculpturalmyth@yahoo.com
[link]
Related content


Comments: 45


Thank you so much! How smooth is is when it dries? And what paint would you use on it?
👍: 0 ⏩: 1

Thanks. It's as smooth as you can make it when it's wet. If you're using the flour mixture with paper - you're going to get the layer from the paper - but the flour mixture is the consistency of glue if you mix it completely (flour does clump). Using watered down white glue - same situation. You can always sand the surface to make it smoother - or you can layer gesso or a thicker paint type product on it to create a smoother finish on top.
In my case I was using these for a theater production - the audience is farther away - so less need for specific detail work. The paint that I used was acrylics for ease, but you could probably use just about anything.
If you have other questions - just ask.
👍: 0 ⏩: 0

do you use clay to skulpt it ? iyou do can you tell me what clay dose not hardn
👍: 0 ⏩: 1
clay that doesn't harden - oil clays, chavant [link]
👍: 0 ⏩: 0

Did you do the same thing with the wolf masks? Did you just add more paper mache to make the muzzle or is this process just for human masks?
👍: 0 ⏩: 1
Same process to make the wolf mask. Honestly you could build out and make anything you'd like! I suppose you'd just be limited by weight or fagility. I think the side mane fringe on the wolf was a heavier paper or cardboard if I remember correctly...
👍: 0 ⏩: 1

can i do this to myself???? im just curious..
coz i dont have a friend around soooo , i plan on doing it to myself.... while looking at the mirror
your works are awesome!!
fave!
^_^
👍: 0 ⏩: 1
I suppose you could... can't see why not... the only issue would be keeping your eyes clear and not getting anything in them from any extra liquid... good luck!!
👍: 0 ⏩: 0

OK, I'll try to do a Death Eater mask. Wish me luck!!
👍: 0 ⏩: 1
Definitely wishing you luck!! Let me know how it works out!
👍: 0 ⏩: 1


this is really useful, i've been looking for a tutorial like this everywhere ")
just one question if you dont mind, how long does it take to dry?
👍: 0 ⏩: 1
Well - as for drying times - the glue mixture version (obviously not applied directly to the skin) is the average drying time for the glue. The mixure is just elemers white glue with a tad bit of water so it covers easier. It takes a tad bit longer than glue due to the water ratio - but it drys about the same really.
The flour mixture version - I'd say it's about 10-20 minutes based on the water to flour ratio. It's all based on the evaporation time. Once you get on to additional layers it may take a little long as the water will soak back into the pervious layers. The heat of the person's face also helps along the process - so the further out the less heat you'll be getting. The last time I did this I mixed in too much water - so be careful. I thought it was never going to set up!!
I definitely recommend doing a face casting if you're going to be making more than one mask. It's a lot of fun to do. All you need is a volunteer and some plaster gauze strips, water and some vaseline. Make sure you coat the face fully - especially any hair like the eye lids and the hairline. Make sure you leave holes for breathing at the nose, but cover all else. Once you're done with the layers, remove the mask and put a strip over the ourside nose holes. After that, vaseline the inside again and pour some plaster in. Once it's set and you remove the gauze strips - you'll have a casting of the person's face. It makes it a lot easier to do mask work over top - and you can do the fabric and glue mache all the better (remember a layer of vaseline or such again so it doesn't get stuck to the surface). Plus you can leave it on there as long as you need - which is not the case for someone's face!!!
Check out [link] and [link]
If there's anything else you need, any questions, just let me know!!
👍: 0 ⏩: 1
Thank you so, so, so much for the advice! I have it saved on the computer now, so I can use it later, I reaaaally needed a mask for a project I'm doing, so thanks!
👍: 0 ⏩: 1
No problem. If you run into any problems - don't be afraid to ask. I'll defintely help out if I can!!
👍: 0 ⏩: 0


Thank you so much for this little guide. I am so using it for next years Mask and maybe more monsters.
👍: 0 ⏩: 1


👍: 0 ⏩: 1
You disappeared - I checked out your project for your son and then you disppeared... ")
👍: 0 ⏩: 0

You're quite knowledgable about masks. Is there a way to work with plaster cast and make it easy?
-Snoof
👍: 0 ⏩: 1
currently for a project i'm working on i'm doing the plaster bandage method and then making a plaster cast of my face to build the mask over and cast. so it's actually the first time i'll be making a plaster cast of my face - and it's going to be fun!!! and i'll probably be taking pics throughout the process - we'll see how it goes. but for the character mask i need, i think it's going to be a whole lot simplier and easier!!
👍: 0 ⏩: 1
That'll be awesome.
What I have is like a plaster glue. I have a demo mask to work on, but its a female mask. Is there a safe way to get this plaster concrete to contour with my face?
-Snoof
👍: 0 ⏩: 1
is the product name 'plaster cast'? hmmm... well, i don't know of it - but, definitely read through any labels you have on it, instructions of any kind.... make sure it's good for skin and such...
otherwise, i'd definitely mix up a test of it and try it on your arm or such to see how it'll react with your skin. plus it'll give you a change to see how long it takes to set up into a solid, if the heat reaction is going to be too hot for your face, and so on. Definitely have a friend work with you when you do the casting of your face – just in case something goes wrong. Always play it on the safe side – especially with your skin, and especially with your face!!!
👍: 0 ⏩: 1
Oh yeah, I know how it reacts. Its like a thick glue, and it sticks. I just need some pointers on if I can shape it into my face instead of a feminine cast. I've never made a mask before, so I'm a little skeptical of the mold.
-Snoof
👍: 0 ⏩: 1
hmmm... in the case that it's like glue, i wouldn't take the chance putting on your face, especially near your eyes and your nose, pretty delicate skin area and all. I definitely recommend the plaster bandages and a layer of vaseline. sorry i can't be of more help.
👍: 0 ⏩: 1
Bah, you're great help. I haven't seen such cool sculptures since going to the Art Institute in Minneapolis. I'm taking the advice of not applying it to my face, which is a safe bet. Since the mask is a female mould, should I remove the chin so that it could fit simply?
-Snoof
👍: 0 ⏩: 1
thanks. so, what are you going for in the design? i really like masks that don't have a chin piece or are just surrounding the eyes, but it tends to be determined more by the character or creature that you're going for... but for fit, i'd agree that that would probably work out in case it's a bit smaller than your face... and if there's anyway to press out and make wider the temple area - otherwise it may be a bit snug. also it matters what the end piece is going to be made of, if it's going to be plaster or cast into something else... like if you're ending up with latex neoprene or such, the size won't matter as much as it'll flex and contour to your face...
👍: 0 ⏩: 1
I'm hoping something along those lines. I'm making multiple masks for halloween, and I highly plan on giving it some frow-lines above the eyes to make it look evil, and instead of strings I'll use double-sided tape on some foam rubber. That way I can transfer multiple masks at a time.
-Snoof
👍: 0 ⏩: 1
as odd as it seems - i've never made my own kick ass scary halloween mask. one of these days... one of these days... then again, i'd then need to find something to do on halloween... i have to admit, i haven't actually done anything on halloween in the last few years except work.
oh, and if it's at all helpful for you, i just uploaded a set of pics for the face casting - [link]
👍: 0 ⏩: 1
Ah, very sweet.
You should try scaring kids with my friends and I. You'd love it. I mean, we don't frighten them to death. I mean that we give them a good jolt just for fun.
-Snoof
👍: 0 ⏩: 1

👍: 0 ⏩: 1
For the last two years I was a walking scarecrow. I think they'll anticipate that this time, so its time to unleash the big guns.
-Snoof
👍: 0 ⏩: 1
oh, but the real question... will they be anticipating that you're anticipating that they'll be anticipating your arrival as a scarecrow...
but seriously, the scarecrow sounds like it was pretty cool... and i definitely want to see what you come up with for this year.
👍: 0 ⏩: 1
Heh, I guess the anticipation is killing me.
I'll do my best with the mask and then take photos. I need to make four masks just in case one is broken.
-Snoof
👍: 0 ⏩: 1
definitely post pics when you're finished, i'd love to see them!
👍: 0 ⏩: 1
Shall do. Thank you for your help.
-Snoof
👍: 0 ⏩: 0

This is very useful!
---
So have you ever made anything by using papier-mache techniques or just intrested about it? Now there's a special club for those artists (Wink)")
Members of the club can submit their works by sending a note to the club (titled “Submission”) and they will be posted up on the ~Papier-mache club page (the deviation is only posted to ~Papier-mache club page if the user gives his or her permission). That way members can get more featured as their work are up in two places at the same time  (Smile)")
Please visit ~Papier-mache club page, become a member and submit your works.
Have a nice day,
Founder and admin of ~Papier-mache club, ~B-Hart

👍: 0 ⏩: 1
thanks, hope it is useful for you - and if you have any questions, definitely feel free to ask away!!
👍: 0 ⏩: 0
Thanks for sharing! I will try it on one of my children but it seems to take a lot of time! I tried it with plaster once but it wasn't a great success. I think this way one can work more precisely. Do you really mean baking flour?
👍: 0 ⏩: 1
yeah... baking flour. it is really really time consuming though. I recommend using those plaster bandages, you can get the same small cuts and delicate pieces but it probably sets up faster. I just hope you have a patient child!!
👍: 0 ⏩: 1
well... plaster bandages are possibly your best bet - alginate is good if you want to do face castings... or moulage... they both set up faster which may be good for those impatient little ones!!!
check out these links, they may help with similar projects with the kids - [link] [link]
and this link was helpful to me when I was making masks - [link]
and check out ~eyefeather her work is great, and she's great on answering questions...
hope this helped.
👍: 0 ⏩: 0