HOME | DD
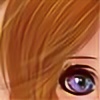
 ryky — Easy fur tutorial

Published: 2013-11-06 17:44:12 +0000 UTC; Views: 95445; Favourites: 5399; Downloads: 1756
Redirect to original
Description
Done in Paint tool SAI 
Related content


Comments: 111

Great tutorial :b I use Krita instead of SAI, so different brushes all together, but it worked great there ")
👍: 0 ⏩: 0
The tutorial is nice, but the brush settings are bullshit. I tried it and the end result was extremely blurry and blocky. Not fun.
👍: 0 ⏩: 0

So uh, dunno if anyone else had this trouble. but I'll say it anyway.
I had a problem seeing what was changed from step 3 to step 4. there is an obvious difference, but it was hard to tell what they did. it took me a minute.
and i realized that was the layer they were adding shadows. with a brush that isn't the same opacity throughout, harder opacity with harder pen pressure. slim shadow fur streaks. they're separating the ones from step 3 into finer hairs, instead of just these fat lumps. it might look like they did something else too, but they didnt. it seems. just added those same shadows throughout.
in layer 6, just changed colors of what was already laid down. didnt add nothin'. im not sure how it was done exactly, but they stayed within the layers of all the others prior (and just changed the color of each simultaneously). then lightened the layer. heavy blending used. same effect could prob be done with the right smudge ("blend") tool, or gradient in photoshop :v
i could be wrong but, ya know. just what i noticed if it's any help >o>
👍: 0 ⏩: 0


Can you please tell me how to do each step as I'm having trouble
👍: 0 ⏩: 1
As the steps go you just use a lighter and smaller brush, each time going in the direction you want the fur to go.
👍: 0 ⏩: 1
Could somebody tell me, how do i do step 4? It is shadow layer or brush? Actually i cant see where shadow layer has been used... As for me it seems like step 4 and 5 are just smaller brush with bright(grey'ish) color and last is Luminosity. Also - should i create new layer for each step (i guess i shouldn't but who knows).
👍: 0 ⏩: 1
Actually... could somebody just write me what type of layer is each step? I'm trying to figure it out right now. I tried to draw all at one layer but i think it's not what i'm supposed to do so now im trying to mess with shade, luminosity and screen layers and i could totally use some help.  (Smile)")
I might be (propably I am) wrong but i guess it's all drawn with same brush and diffrent size and:
s1 is normal
s2 normal same layer as s1
s3 luminosity or mayby normal new layer
s4 shade new layer
s5 normal new
s6 luminosity new
Point my mistakes to me please - i guess i will figure it out at some point but it will take me days. :*
👍: 0 ⏩: 0


new layer,from normal to luminosity, any brush + blur if needed(or wanted)
👍: 0 ⏩: 0


What is it that you're supposed to do near the end?...
👍: 0 ⏩: 0

I'm having trouble with drawing the fur like you do. I looked back in the comments, I changed the density, and pen properties, but it just doesn't work. Any other suggestions?
👍: 0 ⏩: 1

Change the size of the brush for each layer of fur and use Multiply/Shade layers to deepen colors, and use Luminosity layers for the fur to look like the final product
👍: 0 ⏩: 1

I never thought I could make fur.
Thank you so much. This helped me by two million.
hughug n.n
👍: 0 ⏩: 0


Thank you, I so needed this. I am looking for ways to paint a fur trimmed hoodie easily, and this is perfect.
👍: 0 ⏩: 0

YOU SAVED MY ASS! (・∀・) thank you very much for this ~!
👍: 0 ⏩: 0

Thank you for the tutorial! I need help on improving on my digital art
👍: 0 ⏩: 0
I can't drawing fur well, but your tutorial is very much big help to me. thank you!
👍: 0 ⏩: 0

Looks like a tribble.
👍: 0 ⏩: 0

Wow, lovely tutorial! One thing though, when I put it to the same settings as you have, the lines seem so much more blurry than yours... yours seem so crisp! Any possibility you accidentally screenshotted the wrong settings?
Here's a really bad example of the first step I did with the brush settings you have here:
👍: 0 ⏩: 4

I found this browsing dA so its a year later, but if you're still having this problem, its probably not just the density, but you might not have pen pressure on. If you have a tablet like Bamboo, that has pen pressure, but some don't, and you can't use it with a mouse owo
👍: 0 ⏩: 0

RyKy's "density" Was accidentally put up to 100%. He probably was working on a different piece at the time. Change your density to about 10% and it'll look better.
👍: 0 ⏩: 1
Thank you!! I was thinking maybe it was something like that
👍: 0 ⏩: 0

You don't have Pen Pressure on :3
👍: 0 ⏩: 1
I do actually have pen pressure on and it's still doing that.
👍: 0 ⏩: 0

I think it's your pressure o.o
👍: 0 ⏩: 1
I put the exact same settings in... so how is it my pressure?
👍: 0 ⏩: 2

are you using a mouse or a graphics tablet. as if your using a MOUSE then there is your problem. only vector programs like illustrator can imitate brush pressure
👍: 0 ⏩: 2
set the minimum pressure/size setting in the program to 0%
👍: 0 ⏩: 1

can't find it ")
👍: 0 ⏩: 1
your using sai right ? it is in the image mate XD top right where it says min size
👍: 0 ⏩: 1
No, I don't see anything
👍: 0 ⏩: 0
No it's a tablet (intuos 3) with pressure enabled, using the same settings detailed in the tutorial.
👍: 0 ⏩: 1
set you min pressure to 0% you see the intous has a super fine set of sensitivities. it takes control of the program settings not the program taking control of its settings .
👍: 0 ⏩: 1
That makes sense. I did try that, and the result looks much more like the tutorial. I was just confused why it took different settings to get the same result XD
👍: 0 ⏩: 1
its all to do with the tablet. i have the intuos four and it has a very different set of behavior even to the new wacom bamboos i have tried. this feel so much better as it has a more lucid response to it. more communication between it and the pc
👍: 0 ⏩: 0
Like the strokes you make yourself :3
👍: 0 ⏩: 1
My tablet pen has pressure
👍: 0 ⏩: 2
| Next =>